|
In this tutorial, we will describe how to secure a FTP server (VSFTPD stands for “Very Secure FTP Daemon”) using SSL/TLS in Ubuntu 16.04/16.10. After following the various steps in this guide, we will have learned the fundamentals of enabling encryption services in a FTP server for secure data transfers is crucial. RequirementsBefore we move further, make sure that all commands in this article will be run as root or sudo privileged account. Step 1: Generating SSL/TLS Certificate for FTP on Ubuntu1. We will begin by creating a subdirectory under: /etc/ssl/ to store the SSL/TLS certificate and key files if it doesn’t exist: $ sudo mkdir /etc/ssl/private # y7 N# f) d( x9 q; q" o4 G* d n8 G- p/ a& ]
. K4 s' K$ b, Y0 N
# y7 N# f) d( x9 q; q" o4 G* d n8 G- p/ a& ]
. K4 s' K$ b, Y0 N2. Now let’s generate the certificate and key in a single file, by running the command below. $ sudo openssl req -x509 -nodes -keyout /etc/ssl/private/vsftpd.pem -out /etc/ssl/private/vsftpd.pem -days 365 -newkey rsa:2048The above command will prompt you to answer the questions below, don’t forget to enter values that applicable to your scenario. Country Name (2 letter code) [XX]:INState or Province Name (full name) [] ower ParelLocality Name (eg, city) [Default City]:MumbaiOrganization Name (eg, company) [Default Company Ltd]:TecMint.comOrganizational Unit Name (eg, section) []inux and Open SourceCommon Name (eg, your name or your server's hostname) []:tecmintEmail Address []:admin@tecmint.comStep 2: Configuring VSFTPD to Use SSL/TLS on Ubuntu ower ParelLocality Name (eg, city) [Default City]:MumbaiOrganization Name (eg, company) [Default Company Ltd]:TecMint.comOrganizational Unit Name (eg, section) []inux and Open SourceCommon Name (eg, your name or your server's hostname) []:tecmintEmail Address []:admin@tecmint.comStep 2: Configuring VSFTPD to Use SSL/TLS on Ubuntu3. Before we perform any VSFTPD configurations, for those who have UFW firewall enabled, you have to open the ports 990 and 40000-50000 to allow TLS connections and the port range of passive ports to set in the VSFTPD configuration file respectively: $ sudo ufw allow 990/tcp$ sudo ufw allow 40000:50000/tcp$ sudo ufw status4. Now, open the VSFTPD config file and define the SSL details in it: $ sudo vi /etc/vsftpd/vsftpd.confOR$ sudo nano /etc/vsftpd/vsftpd.confThen, add or locate the option ssl_enable and set its value to YES to activate the use of SSL, again, because TLS is more secure than SSL, we will restrict VSFTPD to use TLS instead, by enabling the ssl_tlsv1 option: ssl_enable=YESssl_tlsv1=YESssl_sslv2=NOssl_sslv3=NO5. Next, comment out the lines below using the # character as follows: #rsa_cert_file=/etc/ssl/private/ssl-cert-snakeoil.pem#rsa_private_key_file=/etc/ssl/private/ssl-cert-snakeoil.keyAfterwards, add the lines below to define the location of the SSL certificate and key file: rsa_cert_file=/etc/ssl/private/vsftpd.pemrsa_private_key_file=/etc/ssl/private/vsftpd.pem6. Now, we also have to prevent anonymous users from using SSL, then force all non-anonymous logins to use a secure SSL connection for data transfer and to send the password during login: allow_anon_ssl=NOforce_local_data_ssl=YESforce_local_logins_ssl=YES7. Furthermore, we can use the options below to add more security features in the FTP server. With option require_ssl_reuse=YES, all SSL data connections are required to exhibit SSL session reuse; proving that they know the same master secret as the control channel. So, we should disable it. require_ssl_reuse=NOIn addition, we can set which SSL ciphers VSFTPD will permit for encrypted SSL connections with the ssl_ciphers option. This will help frustrate any efforts by attackers who try to force a specific cipher which they possibly discovered vulnerabilities in: ssl_ciphers=HIGH8. Then, let’s define the port range (min and max port) of passive ports. pasv_min_port=40000pasv_max_port=500009. To enable SSL debugging, meaning openSSL connection diagnostics are recorded to the VSFTPD log file, we can use the debug_ssl option: debug_ssl=YESFinally save the file and close it. Then restart VSFTPD service: $ systemctl restart vsftpdStep 3: Verify FTP with SSL/TLS Connections on Ubuntu10. After performing all the above configurations, test if VSFTPD is now using SSL/TLS connections by trying to use FTP from the command line as below. From the output below, there is an error message telling us VSFTPD can only permit users (non-anonymous) to login from secure clients which support encryption services. $ ftp 192.168.56.10Connected to 192.168.56.10 (192.168.56.10).220 Welcome to TecMint.com FTP service.Name (192.168.56.10:root) : ravi530 Non-anonymous sessions must use encryption.Login failed.421 Service not available, remote server has closed connectionftp>The command line doesn’t support encryption services thus resulting to the error above. Therefore, to securely connect to a FTP server with encryption services enabled, we need a FTP client that supports SSL/TLS connections by default, such as FileZilla. Step 4:Install FileZilla On Clients to Connect FTP SecurelyFileZilla is a powerful, widely used cross-platform FTP client which supports FTP over SSL/TLS and more. To install FileZilla on a Linux client machine, use the following command. --------- On Debian/Ubuntu ---------$ sudo apt-get install filezilla --------- On CentOS/RHEL/Fedora --------- # yum install epel-release filezilla--------- On Fedora 22+ --------- $ sudo dnf install filezilla12. Once the installation completes, open it and go to File=>Sites Manager or (press Ctrl+S) to get the Site Manager interface below. 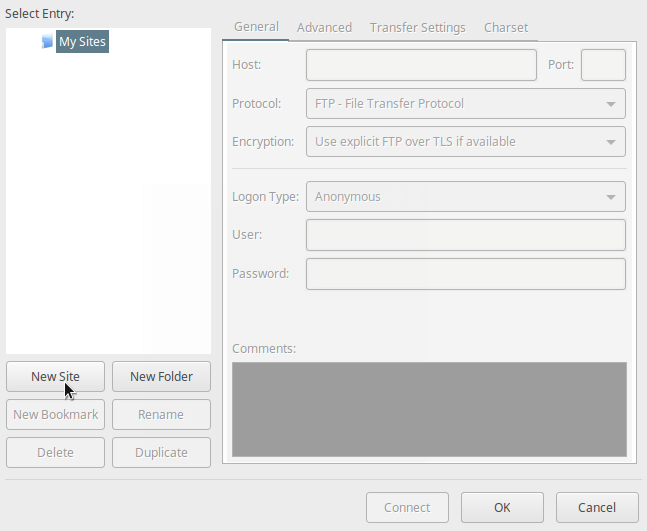 Filezilla Site Manager Filezilla Site Manager13. Now, define the host/site name, add the IP address, define the protocol to use, encryption and logon type as in the screen shot below (use values that apply to your scenario): Click on New Site button to configure a new site/host connection. Host: 192.168.56.10Protocol: FTP – File Transfer ProtocolEncryption: Require explicit FTP over #recommended Logon Type: Ask for password #recommended User: username Configure New FTP Site on Filezilla Configure New FTP Site on Filezilla14. Then click on Connect from the interface above to enter the password, and then verify the certificate being used for the SSL/TLS connection, and click OK once more to connect to the FTP server:  Verify FTP SSL Certificate Verify FTP SSL Certificate15. Now, you should have logged successfully into the FTP server over a TLS connection, check the connection status section for more information from the interface below.  Connected to Ubuntu FTP Server Connected to Ubuntu FTP Server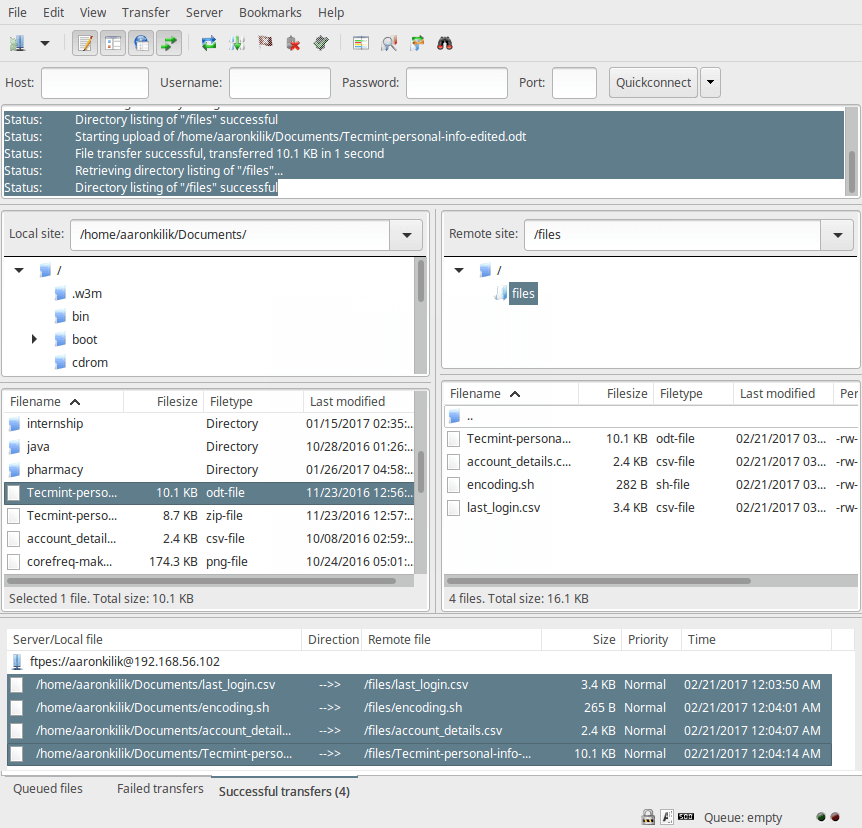 Secure FTP File Transfer using Filezilla Secure FTP File Transfer using FilezillaThat’s all! Always remember that installing a FTP server without enabling encryption services has certain security implications. As we explained in this tutorial, you can configure a FTP server to use SSL/TLS connections to implement security in Ubuntu 16.04/16.10. If you face any issues in setting up SSL/TLS on FTP server, do use the comment form below to share your problems or thoughts concerning this tutorial/topic. |  |手机版|小黑屋|赛格电脑 华强北 电脑城 南山赛格 龙岗电子世界 龙华电脑城 沙井电脑城 松岗电脑城 pc4g.com
( 粤ICP备16039863号 )
|手机版|小黑屋|赛格电脑 华强北 电脑城 南山赛格 龙岗电子世界 龙华电脑城 沙井电脑城 松岗电脑城 pc4g.com
( 粤ICP备16039863号 )
 发表于 2012-9-14 00:53:57