imx6ul之OpenWRT中使用无线网卡做中继器与AP热点! Y. D: c) w' w! ]
3 `3 ]& |( `8 ~" d8 f' Z$ J. V中继器与AP的实现这里我们假定中继器完成下面这样的一个功能: Wired Network ---> Wireless Network ---> 上级无线路由器
( r, X# @$ c$ {- C- X; F F
即从外部插入一个网线,通过imx6UL上面的无线网卡将数据转发到上级的路由器上面, 当然也可以完成下面这样的传送:& w `" h6 p+ l' Z
Wireless Network(AP mode) --> Wireless Network(Client) --> 上级无线路由器. |# b4 w* M g2 Q0 c0 p
即设立一个AP热点,相当于一个路由器,然后再将这个AP的数据通过另外一个无线网卡转发到上一级的路由器或者WLAN上面。 用图片来表示如下: 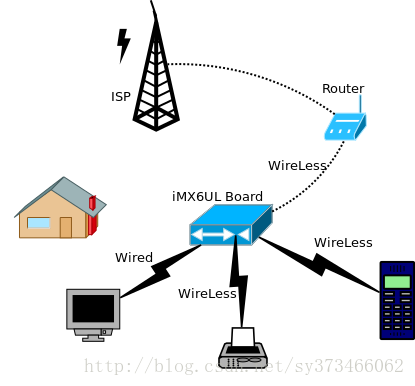
: [& u3 _8 z8 W0 ?0 [0 t5 [要完成这些功能, 我们需要: - 1. 驱动无线网卡
- 2. 建立AP热点
- 3. 其中一个wired或者wireless介入到上一级路由器或者WLAN中
- 4. 使用IPTables来对数据包进行转发1 [5 H* s, w1 }, ]3 g, X4 j
7 {- A- {: Q/ K* g. k8 ^
对于1,我们在前面已经完成,对于Wired Network访问WLAN我们也已经在前面完成。所以这篇我们将完成2与3, 以及4。
6 B9 r- S8 s( Y8 w0 I
AP热点的建立建立AP热点,我们使用经典的Hostapd工具来完成, 这个在OpenWRT中已经存在, 直接选上,然后build即可。 Hostapd的使用$ Q; T+ w: g' K& u: l2 C3 ]
然后我们可以查看对应的使用帮助 [plain] view plaincopy. z( |- Z% r4 o
# z7 a4 x; e7 A- e" ], b: ?: D0 W" Z9 @5 A* k4 ^5 B
- root@(none):/# hostapd --help
- hostapd: invalid option -- '-'
- hostapd v2.5
- User space daemon for IEEE 802.11 AP management,
- IEEE 802.1X/WPA/WPA2/EAP/RADIUS Authenticator
- Copyright (c) 2002-2015, Jouni Malinen <j@w1.fi> and contributors
-
- usage: hostapd [-hdBKtv] [-P <
 ID file>] [-e <entropy file>] \ ID file>] [-e <entropy file>] \ - [-g <global ctrl_iface>] [-G <group>] \
- <configuration file(s)>
-
- options:
- -h show this usage
- -d show more debug messages (-dd for even more)
- -B run daemon in the background
- -e entropy file
- -g global control interface path
- -G group for control interfaces
- -P PID file
- -K include key data in debug messages
- -t include timestamps in some debug messages
- -v show hostapd version 3 J A9 k: v/ M+ o
8 l; R5 P9 l O
9 v+ C. i& X4 u9 A1 U2 `因此可以确定需要一个config文件, 这个configuration file我们如下填写:2 K7 i" h( r& g1 C; Q" K Q
[plain] view plaincopy; C1 A, b5 K' O/ ]( G7 M
1 l2 X( h( A1 P% P5 ^- g+ \2 u- O* |7 d
- root@(none):/# cat /etc/hostapd_ori.conf
- interface=wlan1
- ssid=TonyOpenWRT
- channel=9
- hw_mode=g
- ignore_broadcast_ssid=0
- auth_algs=1
- wpa=3
- wpa_passphrase=TonyHo123456
- wpa_key_mgmt=WPA-PSK
- wpa_pairwise=TKIP
- rsn_pairwise=CCMP
+ [: |2 I! {: N H' q3 ^6 v
& e- e7 V1 ` @ P1 z
即我们创建一个SSID为TonyOpenWRT的热点, wpa_passphrase为密码, 后面的为加密方式, 然后还选择了channel, 这个channel可以通过前面的iw list来查看, 例如其中一个为:* N9 A4 D; i/ m* q& Y( b
[plain] view plaincopy* H: h& a k) [: _) _
: P' x8 n7 ~2 c' e
" W% |' V$ k- g; V+ ?7 p- w( C* h, c
- Frequencies:
- * 2412 MHz [1] (20.0 dBm)
- * 2417 MHz [2] (20.0 dBm)
- * 2422 MHz [3] (20.0 dBm)
- * 2427 MHz [4] (20.0 dBm)
- * 2432 MHz [5] (20.0 dBm)
- * 2437 MHz [6] (20.0 dBm)
- * 2442 MHz [7] (20.0 dBm)
- * 2447 MHz [8] (20.0 dBm)
- * 2452 MHz [9] (20.0 dBm)
- * 2457 MHz [10] (20.0 dBm)
- * 2462 MHz [11] (20.0 dBm)
- * 2467 MHz [12] (disabled)
- * 2472 MHz [13] (disabled)
- * 2484 MHz [14] (disabled)
& z& _3 D3 R& u
F! ~# v! H+ G8 Z
' ?2 E6 F e; n1 m6 f* O% l后面的【】中的就是channel了。
3 a7 W# W$ @% T5 [1 \建立AP1 j2 K8 k' P+ \7 W
然后我们使用后台运行的方式启动hostapd,并且打开debug信息,便于我们查看: [plain] view plaincopy
: |! V Z4 R3 `$ ?: e! M3 c: Y) P8 J( l: t+ g8 t
3 B$ ~# v r& w1 v& g2 ?- root@(none):/# hostapd -B -d /etc/hostapd_ori.conf
- random: Trying to read entropy from /dev/random
- Configuration file: /etc/hostapd_ori.conf
- rfkill: Cannot open RFKILL control device
- nl80211: RFKILL status not available
- nl80211: TDLS supported
- nl80211: TDLS external setup
- nl80211: Supported cipher 00-0f-ac:1
- nl80211: Supported cipher 00-0f-ac:5
- nl80211: Supported cipher 00-0f-ac:2
- nl80211: Supported cipher 00-0f-ac:4
- nl80211: Supported cipher 00-0f-ac:6
- nl80211: Using driver-based off-channel TX
- nl80211: Use separate P2P group interface (driver advertised support)
- nl80211: interface wlan1 in phy phy1
- nl80211: Set mode ifindex 9 iftype 3 (AP)
- nl80211: Setup AP(wlan1) - device_ap_sme=0 use_monitor=0
- nl80211: Subscribe to mgmt frames with AP handle 0xcfd5d8
- nl80211: Register frame type=0xb0 (WLAN_FC_STYPE_AUTH) nl_handle=0xcfd5d8 match=
- nl80211: Register frame type=0x0 (WLAN_FC_STYPE_ASSOC_REQ) nl_handle=0xcfd5d8 match=
- nl80211: Register frame type=0x20 (WLAN_FC_STYPE_REASSOC_REQ) nl_handle=0xcfd5d8 match=
- nl80211: Register frame type=0xa0 (WLAN_FC_STYPE_DISASSOC) nl_handle=0xcfd5d8 match=
- nl80211: Register frame type=0xc0 (WLAN_FC_STYPE_DEAUTH) nl_handle=0xcfd5d8 match=
- nl80211: Register frame type=0xd0 (WLAN_FC_STYPE_ACTION) nl_handle=0xcfd5d8 match=
- nl80211: Register frame type=0x40 (WLAN_FC_STYPE_PROBE_REQ) nl_handle=0xcfd5d8 match=
- [ 495.443813] IPv6: ADDRCONF(NETDEV_UP): wlan1: link is not ready
- nl80211: Add own interface ifindex 9
- nl80211: if_indices[16]: 9
- phy: phy1
- BSS count 1, BSSID mask 00:00:00:00:00:00 (0 bits)
- nl80211: Regulatory information - country=00
- nl80211: 2402-2472 @ 40 MHz 20 mBm
- nl80211: 2457-2482 @ 40 MHz 20 mBm (no IR)
- nl80211: 2474-2494 @ 20 MHz 20 mBm (no OFDM) (no IR)
- nl80211: 5170-5250 @ 160 MHz 20 mBm (no IR)
- nl80211: 5250-5330 @ 160 MHz 20 mBm (DFS) (no IR)
- nl80211: 5490-5730 @ 160 MHz 20 mBm (DFS) (no IR)
- nl80211: Added 802.11b mode based on 802.11g information
- Completing interface initialization
- Mode: IEEE 802.11g Channel: 9 Frequency: 2452 MHz
- DFS 0 channels required radar detection
- nl80211: Set freq 2452 (ht_enabled=0, vht_enabled=0, bandwidth=20 MHz, cf1=2452 MHz, cf2=0 MHz)
- * freq=2452
- * vht_enabled=0
- * ht_enabled=0
- RATE[0] rate=10 flags=0x1
- RATE[1] rate=20 flags=0x1
- RATE[2] rate=55 flags=0x1
- RATE[3] rate=110 flags=0x1
- RATE[4] rate=60 flags=0x0
- RATE[5] rate=90 flags=0x0
- RATE[6] rate=120 flags=0x0
- RATE[7] rate=180 flags=0x0
- RATE[8] rate=240 flags=0x0
- RATE[9] rate=360 flags=0x0
- RATE[10] rate=480 flags=0x0
- RATE[11] rate=540 flags=0x0
- hostapd_setup_bss(hapd=0xcfcf50 (wlan1), first=1)
- wlan1: Flushing old station entries
- nl80211: flush -> DEL_STATION wlan1 (all)
- wlan1: Deauthenticate all stations
- nl80211: send_mlme - da= ff:ff:ff:ff:ff:ff noack=0 freq=0 no_cck=0 offchanok=0 wait_time=0 fc=0xc0 (WLAN_FC_STYPE_DEAUTH) nlmode=3
- nl80211: send_mlme -> send_frame
- nl80211: send_frame - Use bss->freq=2452
- nl80211: send_frame -> send_frame_cmd
- nl80211: Frame command failed: ret=-16 (Device or resource busy) (freq=2452 wait=0)
- wpa_driver_nl80211_set_key: ifindex=9 (wlan1) alg=0 addr=(nil) key_idx=0 set_tx=0 seq_len=0 key_len=0
- wpa_driver_nl80211_set_key: ifindex=9 (wlan1) alg=0 addr=(nil) key_idx=1 set_tx=0 seq_len=0 key_len=0
- wpa_driver_nl80211_set_key: ifindex=9 (wlan1) alg=0 addr=(nil) key_idx=2 set_tx=0 seq_len=0 key_len=0
- wpa_driver_nl80211_set_key: ifindex=9 (wlan1) alg=0 addr=(nil) key_idx=3 set_tx=0 seq_len=0 key_len=0
- Using interface wlan1 with hwaddr 94:0c:6d:7c:12:f6 and ssid "TonyOpenWRT"
- Deriving WPA PSK based on passphrase
- SSID - hexdump_ascii(len=11):
- 54 6f 6e 79 4f 70 65 6e 57 52 54 TonyOpenWRT
- PSK (ASCII passphrase) - hexdump_ascii(len=12): [REMOVED]
- PSK (from passphrase) - hexdump(len=32): [REMOVED]
- random: Got 15/20 bytes from /dev/random
- random: Only 15/20 bytes of strong random data available from /dev/random
- random: Not enough entropy pool available for secure operations
- WPA: Not enough entropy in random pool for secure operations - update keys later when the first station connects
- GMK - hexdump(len=32): [REMOVED]
- Key Counter - hexdump(len=32): [REMOVED]
- WPA: Delay group state machine start until Beacon frames have been configured
- nl80211: Set beacon (beacon_set=0)
- nl80211: Beacon head - hexdump(len=62): 80 00 00 00 ff ff ff ff ff ff 94 0c 6d 7c 12 f6 94 0c 6d 7c 12 f6 00 00 00 00 00 00 00 00 00 00 64 00 11 04 00 0b 54 6f 6e 79 4f 70 65 6e 57 52 54 01 08 82 84 8b 96 0c 12 1y
- 01 09
- nl80211: Beacon tail - hexdump(len=65): 2a 01 04 32 04 30 48 60 6c 30 14 01 00 00 0f ac 02 01 00 00 0f ac 04 01 00 00 0f ac 02 00 00 dd 16 00 50 f2 01 01 00 00 50 f2 02 01 00 00 50 f2 02 01 00 00 50 f2 02 7f 08 00
- nl80211: ifindex=9
- nl80211: beacon_int=100
- nl80211: dtim_period=2
- nl80211: ssid - hexdump_ascii(len=11):
- 54 6f 6e 79 4f 70 65 6e 57 52 54 TonyOpenWRT
- * beacon_int=100
- nl80211: hidden SSID not in use
- nl80211: privacy=1
- nl80211: auth_algs=0x1
- nl80211: wpa_version=0x3
- nl80211: key_mgmt_suites=0x2
- nl80211: pairwise_ciphers=0x18
- nl80211: group_cipher=0x8
- nl80211: SMPS mode - off
- nl80211: beacon_ies - hexdump(len=10): 7f 08 00 00 00 00 00 00 00 40
- nl80211: proberesp_ies - hexdump(len=10): 7f 08 00 00 00 00 00 00 00 40
- nl80211: assocresp_ies - hexdump(len=10): 7f 08 00 00 00 00 00 00 00 40
- WPA: Start group state machine to set initial keys
- WPA: group state machine entering state GTK_INIT (VLAN-ID 0)
- GTK - hexdump(len=32): [REMOVED]
- WPA: group state machine entering state SETKEYSDONE (VLAN-ID 0)
- wpa_driver_nl80211_set_key: ifindex=9 (wlan1) alg=2 addr=0x8dc74 key_idx=1 set_tx=1 seq_len=0 key_len=32
- nl80211: KEY_DATA - hexdump(len=32): [REMOVED]
- broadcast key
- nl80211: Set wlan1 operstate 0->1 (UP)
- netlink: Operstate: ifindex=9 linkmode=-1 (no change), operstate=6 (IF_OPER_UP)
- wlan1: interface state UNINITIALIZED->ENABLED
- wlan1: AP-ENABLED
- wlan1: Setup of interface done.
- ctrl_iface not configured!
) w% b- N. q0 S& W( f" f
# P$ p# n; x) w: G) A$ c
" P: |( W3 s- U
其中里面用到了加密时候需要的随机数,这个是使用内核中的random节点来生成的,所以我们在内核这两个还需要添加random驱动。
* F% p' a& {; r5 u# ?验证AP在验证之前,我们需要给我们的这个网卡自己一个IP地址, 因此直接: [plain] view plaincopy) k# ?% e7 W* f% F. ?: Q
; h; k" n1 A' k& {- ~) \
: T) y C0 T; ]% X3 S" i* h# M& y% y0 j
- root@(none):/# ifconfig wlan1 192.168.2.1
- root@(none):/# ifconfig wlan1
- wlan1 Link encap:Ethernet HWaddr 94:0c:6d:7c:12:f6
- inet addr:192.168.2.1 Bcast:192.168.2.255 Mask:255.255.255.0
- inet6 addr: fe80::960c:6dff:fe7c:12f6/64 Scope
 ink ink - UP BROADCAST RUNNING MULTICAST MTU:1500 Metric:1
- RX packets:131 errors:0 dropped:0 overruns:0 frame:0
- TX packets:106 errors:0 dropped:0 overruns:0 carrier:0
- collisions:0 txqueuelen:1000
- RX bytes:20162 (19.6 KiB) TX bytes:20954 (20.4 KiB)
$ p2 W: G P# b. J6 w
, w& C" n2 L) _
* E1 V7 q) d- d8 Y& I
然后我们打开手机查看是否可以看到我们的热点:
% o* {+ c! G& I; N& c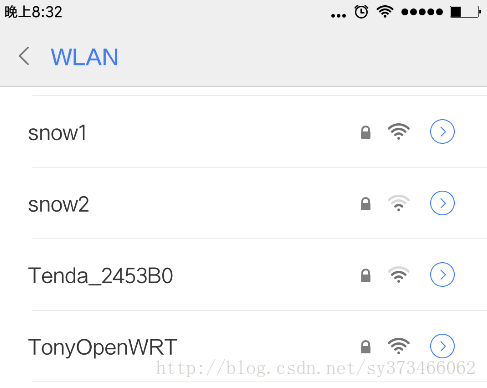 8 k; K& L7 n% k8 V. k 8 k; K& L7 n% k8 V. k
然后我们使用手动配置IP方式连接热点
- p0 s8 D( m! R6 x4 J1 r" h$ v 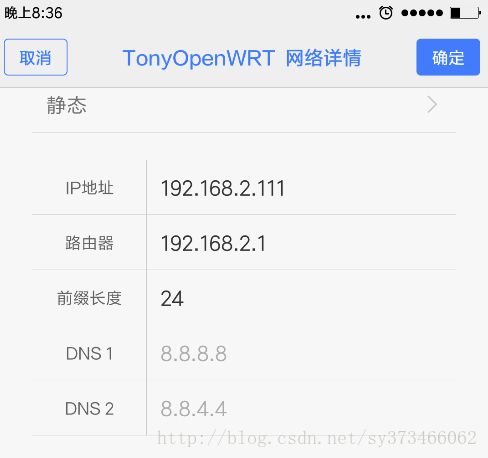 ~3 q- l3 F( ]0 |' @5 B* C2 W, X; ?% i ~3 q- l3 F( ]0 |' @5 B* C2 W, X; ?% i
连接完成后, 我们可以看到已经连接的状态: 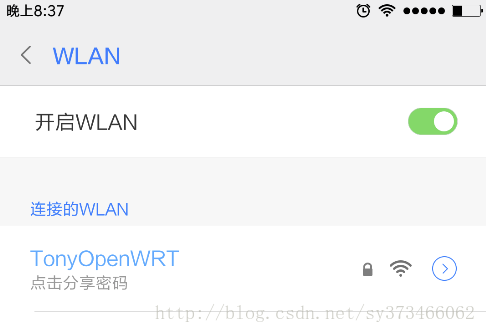
; W6 E H* ~& U: s0 s+ `5 L( }, D( y然后在手机上面可以Ping一把确定是否连通: 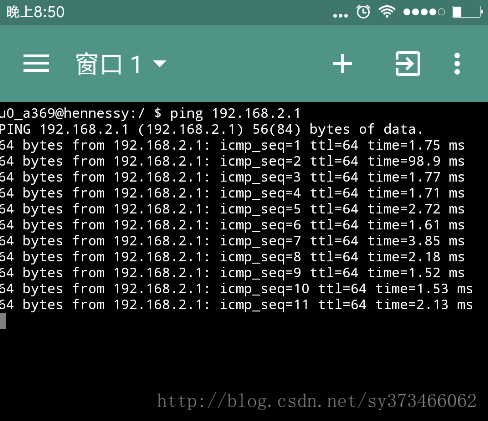
: L: g2 c" W8 j" O4 G然后在iMX6UL上面也来ping一把这个手机: [plain] view plaincopy4 f0 g0 q6 V5 P4 @1 g; U6 o
# C% S4 l. b/ ^ D
( M# u- m1 `' z8 t- root@(none):/# ping 192.168.2.111
- PING 192.168.2.111 (192.168.2.111): 56 data bytes
- 64 bytes from 192.168.2.111: seq=0 ttl=64 time=90.952 ms
- 64 bytes from 192.168.2.111: seq=1 ttl=64 time=143.093 ms
- 64 bytes from 192.168.2.111: seq=2 ttl=64 time=4.508 ms
- 64 bytes from 192.168.2.111: seq=3 ttl=64 time=46.859 ms
- 64 bytes from 192.168.2.111: seq=4 ttl=64 time=2.539 ms
- 64 bytes from 192.168.2.111: seq=5 ttl=64 time=2.697 ms
- ^C
- --- 192.168.2.111 ping statistics ---
- 6 packets transmitted, 6 packets received, 0% packet loss
- round-trip min/avg/max = 2.539/48.441/143.093 ms ! I# f' ?! k& p
( C9 j& t# x1 A8 w" g
8 X$ Y. V. k& j! `. v4 ^7 h, {3 x至此,基本的连接就好了, 如果想要自动获取IP地址,那么我们还需要配置DHCPD。
5 m2 N8 ^4 M0 E9 G$ o& C8 X0 p, F! q' s+ j1 p! _
wpa_supplicant的配置前面我们使用其中一个网卡,配置好了AP, 接下来我们使用另外一个Wireless作为上一级router的接入设备。 这个可以参考我以前写的文章: Yocto i.MX6 (TQIMX6) (03) : wifi网卡的相关工具wpa_supplicant与dhcp 1 h+ ]& N3 K- m
但是wpa_supplicant的版本升级后, 和hostapd的使用基本一致起来, 因此以前的使用方法稍微有些不同了。 配置创建一个配置文件,写明需要接入的SSID,密码等信息: [plain] view plaincopy
" l" b. b% `6 a" P# u% P, K/ p( I) n
5 _7 k, |8 W3 E6 a: i2 g9 b
- root@(none):/# cat /etc/wpa.conf
- ctrl_interface=/var/run/wpa_supplicant
- network={
- ssid="XXX"
- proto=WPA
- key_mgmt=WPA-PSK
- pairwise=TKIP
- group=TKIP
- psk="ASSWORD"
- }
$ N ], o9 H" }7 R- k( Q
l% \7 Z) `; [% T) }! S# F. n4 `) t
其中XXX是路由器的热点名字, psk填写Password, 加密方式TKIP需要根据实际情况填写,不明白可以看我以前的文章,或者直接man。
1 E! y; o# k) J" e: n2 ~运行先创建一个runtime目录: [plain] view plaincopy' k9 w7 |5 q" ]5 E c9 Q9 T
8 `6 Z& ^: U; L
8 D4 [, m; r4 q3 \- {; Q0 [# j- root@(none):/# mkdir /var/run/wpa_supplicant % }& H# C9 l x. U3 T5 a( t
x" f# C9 c* J1 n
+ o& y3 ]) z( p$ s
然后直接在后台运行:" A- u1 p, p+ z7 q# f# b
[plain] view plaincopy3 l/ N, k2 e. V# J5 k% c& S
1 f: K: i7 N6 i7 R$ Y4 e. Z0 O+ `8 F+ @' L6 }& g! Z/ ^
- root@(none):/# wpa_supplicant -B -iwlan0 -c /etc/wpa.conf
- Successfully initialized wpa_supplicant
- rfkill: Cannot open RFKILL contro[ 172.506937] ieee80211 phy0: rt2x00lib_request_firmware: Info - Loading firmware file 'rt2870.bin'
- l device
- [ 172.527112] ieee80211 phy0: rt2x00lib_request_firmware: Info - Firmware detected - version: 0.29
- [ 173.083412] IPv6: ADDRCONF(NETDEV_UP): wlan0: link is not ready
- root@(none):/# [ 174.937567] wlan0: authenticate with bc:d1:77:a0:4f:3c
- [ 175.073446] wlan0: send auth to bc:d1:77:a0:4f:3c (try 1/3)
- [ 175.082318] wlan0: authenticated
- [ 175.087051] rt2800usb 1-1.2.1:1.0 wlan0: disabling HT/VHT due to WEP/TKIP use
- [ 175.098735] wlan0: associate with bc:d1:77:a0:4f:3c (try 1/3)
- [ 175.108018] wlan0: RX AssocResp from bc:d1:77:a0:4f:3c (capab=0x411 status=0 aid=5)
- [ 175.129960] IPv6: ADDRCONF(NETDEV_CHANGE): wlan0: link becomes ready
- [ 175.136678] wlan0: associated
- [ 176.069997] IPv6: wlan0: IPv6 duplicate address fe80::7edd:90ff:feb2:73b1 detected! + k; k$ }# I+ U8 s
! Y+ e; o/ S4 Z1 P0 ?% j
! q) |- T9 F8 |' D( B( D4 I+ H验证+ s& S; ?& X z( I
使用wpa_cli看查看连接的状态1 a2 h! ]1 c" v( ~2 C1 @
[plain] view plaincopy
( \5 T1 U2 Z( g
/ F7 @+ ?0 E8 V, }9 l, ^* r% K5 ` g# S+ C0 r7 g0 z
- root@(none):/# wpa_cli status
- Selected interface 'wlan0'
- bssid=bc:d1:77:a0:4f:3c
- freq=2412
- ssid=XXX
- id=0
- mode=station
- pairwise_cipher=TKIP
- group_cipher=TKIP
- key_mgmt=WPA-PSK
- wpa_state=COMPLETED
- address=7c:dd:90:b2:73:b1
- uuid=1e82e362-f927-544e-aa4d-1a229533944c
% K( ]+ `* y! _. E; S
0 X3 ]8 x5 [, bstatus为COMPLETED那么表示连接上了, 然后我们获取IP地址, 并尝试ping国内的某个网站:
; \4 @0 p K( B8 |3 d- q% ^9 ~2 ][plain] view plaincopy5 x* n/ v( o# h- ~: ?0 n: }
% A/ B8 a- ~: L2 w% |
+ D5 j, q3 ]7 f$ H) c
- root@(none):/# udhcpc -i wlan0
- udhcpc (v1.24.1) started
- Sending discover...
- Sending select for 192.168.1.112...
- Lease of 192.168.1.112 obtained, lease time 86400
- /etc/udhcpc.d/50default: Adding DNS 192.168.1.1
- /etc/udhcpc.d/50default: Adding DNS 0.0.0.0
-
- root@(none):/# ping meitu.com
- PING meitu.com (42.62.69.156): 56 data bytes
- 64 bytes from 42.62.69.156: seq=0 ttl=42 time=44.499 ms
- 64 bytes from 42.62.69.156: seq=1 ttl=42 time=44.956 ms
- 64 bytes from 42.62.69.156: seq=2 ttl=42 time=43.122 ms
- 64 bytes from 42.62.69.156: seq=3 ttl=42 time=43.387 ms
- 64 bytes from 42.62.69.156: seq=4 ttl=42 time=46.467 ms
- 64 bytes from 42.62.69.156: seq=5 ttl=42 time=46.267 ms
- 64 bytes from 42.62.69.156: seq=6 ttl=42 time=43.843 ms
- ^C
- --- meitu.com ping statistics ---
- 7 packets transmitted, 7 packets received, 0% packet loss
- round-trip min/avg/max = 43.122/44.648/46.467 ms ! \9 x; C# u7 ^8 B
4 B5 |: M0 U" d/ N
至此, 我们就完成了基本的配置工作。
7 i5 c( v& g4 W' ?6 q; y3 X, Q
" @. A: {3 A J2 f$ a: C/ m" F! O0 j3 G$ i" |; D! @! T
$ W4 C, c& I' y8 y* v本文链接:https://www.ngui.cc/el/1322000.html
8 s9 a5 J& C( T& W
4 O( X% j5 { x9 [# \1 a5 Q |
 |手机版|小黑屋|赛格电脑 华强北 电脑城 南山赛格 龙岗电子世界 龙华电脑城 沙井电脑城 松岗电脑城 pc4g.com
( 粤ICP备16039863号 )
|手机版|小黑屋|赛格电脑 华强北 电脑城 南山赛格 龙岗电子世界 龙华电脑城 沙井电脑城 松岗电脑城 pc4g.com
( 粤ICP备16039863号 )
 发表于 2022-12-17 19:45:35